- Usage
- Recommended workflow
Recommended workflow
As opposed to all other implementations of deconvolution in other software, the usage of the SVDecon module is generally recommended towards the end of your luminance (detail enhancement) processing workflow. That is, ideally, you will have already carried out the bulk of your stretching and detail enhancement before launching the SVDecon module. The reason for this, is that the SVDecon module makes extensive use of knowledge that indicates how you processed your data prior to invoking it, and how detail evolved and changed during your processing. This knowledge specifically feeds into the way noise and artifacts are detected and suppressed during the regularisation stage for each iteration.
For most datasets, superior results are achieved by using the module in Spatially Variant mode, e.g by providing multiple star samples. In cases where providing star samples is too difficult or time consuming, the default synthetic model will still very good results however.
Selecting samples for Spatially Variant deconvolution
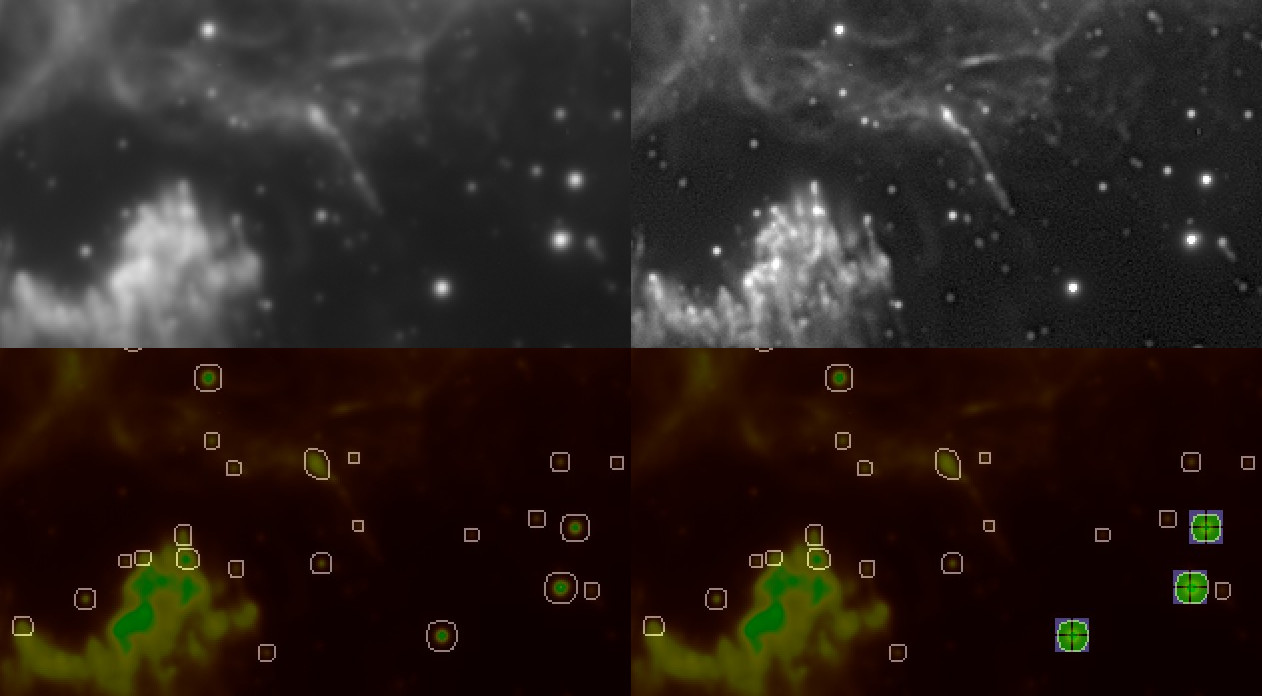
To provide the module with PSF samples, the 'Sampling' view should be selected. This view is accessed by clicking the 'Sampling' button in the top right corner. This special was designed to help the user identify and select good quality star samples.
In the 'Sampling' view, A convenient rendering of the image is shown, in which;
- Candidate stars are delineated by an outline.
- Red pixels show low quality areas
- Yellow pixels show borderline usable areas.
- Green pixels show high quality areas.
Ideally, you should endeavour to find stars samples that have a green inner core without any red pixels at their centre. If you cannot find such stars and you need samples in a specific area you may choose samples that have a yellow core instead. As a rule of thumb, providing samples in all areas of the image takes precedence over the quality of the samples.
You should avoid;
- Stars that sit on top of nebulosity or other detail.
- Objects that are not stars (for example distant galaxies)
- Stars that are close to other stars
- Stars that appear markedly different in shape compared to other stars nearby
- Stars whose outline appear non-oval or concave or markedly different to the outlines of other stars nearby
Star samples can be made visible on the regular view (e.g. the view with the before/after deconvolved result) by holding the left mouse button. Star samples will also be visible outside any preview area, this also doubles as a reminder that any selected PSF Resampling algorithm will not resample those stars (see 'PSF resampling mode'). You may also quickly de-select stars via the regular before/after view by clicking on a star that has a sample over it that you wish to remove.
The Sampled Area
The immediate area of a sampled star is indicated by a blue square ('bounding box'). This area is the 'Sampled Area'. A sampled area should contain one star sample only; you should avoid selecting samples that have parts of other stars in the blue square surrounding a prospective sample. The size of the blue square is determined by the 'Sampled Area' parameter. The 'Sampled Area' parameter should be set in such a way that all samples' green pixels fall well within the blue area's confines and are not 'cut-off' by the blue square's boundaries.
Star sample outlines and apodization mask
The star sample outlines are constructed using the apodization mask that is generated. You may touch up this mask to avoid low-quality stars being included in the blue square 'Sampled Area', if that helps to better sample a high quality star.
Number of samples and location of samples
Ideally samples are specified in all areas of the image in equal numbers. The module will work with any amount of samples, however ten or more, good quality samples is recommended. The amount of samples you should provide is largely dependent on how severe the distortions are in the image and how they vary across the image.
Please note that, when clicking a sample, the indicated centre of a sample will not necessarily be the pixel you clicked, nor necessarily the brightest pixel. Instead, the indicated centre is the "luminance centroid". It is the weighted (by brightness) mean of all pixels in the sample. This is so that, for example, samples of stars that are deformed or heavily defocused (where their centre is less bright than their surroundings) are still captured correctly.
Heavily distorted PSFs
For images with heavily distorted PSFs that are highly variant (for example due to field rotation, tracking error, field curvature, coma, camera mounting issue, or some other acquisition issue that has severely deformed stars in an anisotropic way), the 'Spatial Error' parameter may need to be increased, with the 'Sampled Iterations' increased in tandem. The 'Spatial Error' parameter relaxes locality constraints on the recovered detail, and increasing this parameter, allows the algorithm to reconstruct point lights from pixels that are much less co-located than would normally be the case. Deconvolution is not a 100% cure for such issues, and its corrective effect is limited by what the data can bear without artifacts (due to noise) becoming a limiting factor.
Under such challenging conditions, improvement should be regarded in the context of improved detail, rather than perfectly point or circle-like stellar profiles. While stars may definitely become more pin-point and/or 'rounder', particularly areas that are (or are close to) over-exposing, such as very bright stars, may not contain enough data for reconstruction due to clipping or non-linearity issues. Binning the resulting image slightly afterwards, may somewhat help hide issues in the stellar profiles. Alternatively, the Repair module may help correcting these stars.
PSF Resampling mode
The SVDecon module is innovative in many ways, and one such innovation is its ability to re-sample the stars as they are being deconvolved. This feedback tends to reduce the development of ringing artifacts and can improve results further.
Three 'PSF Resampling' modes are available;
- None; no resampling and model reconstruction occurs during deconvolution - the samples are used as-is.
- Intra-Iteration; all samples are resampled at their original locations for each iteration
- Intra-Iteration + Centroid Tracking; all samples are resampled after their locations have first been re-determined.Intra-iteration resampling while a preview is being used will only re-sample the samples that are contained within the preview. Therefore, the full effects of intra-iteration resampling are best evaluated without a preview being defined. As, depending on your system's CPU and GPU resources, intra-iteration resampling may be rather taxing, it may be useful to evaluate its effects only once all samples are set and once you are happy with the results without PSF resampling activated.
Dynamic Range Extension
The 'Dynamic Range Extension' parameter provides any reconstructed highlights with 'room' to show their detail, rather than clipping themt against the white point of the input image. Use this parameter if significant latent detail is recovered that requires more dynamic range to be fully appreciated. Lunar datasets can often benefit from an extended dynamic range allocation.
Planetary, solar and lunar datasets
A preset for lunar, planetary, solar use quickly configures the module for lunar, planetary and solar purposes; it clears the apodization mask (no star sampling possible/needed) and dials in a much higher amount of iterations. It also dials in a large synthetic PSF radius more suitable to reverse atmospheric turbulence-induced blur for high magnification datasets. You will likely want to increase the amount of iterations further, as well as adjust the PSF radius to better model the specific seeing conditions.
Evaluating the result
A considerable amount of research and development has gone into CPU and GPU optimisation of the algorithm; an important part of image processing is getting accurate feedback as soon as possible on decisions made, samples set, and parameters tweaked.
As a result, it is possible to evaluate the result of including and excluding samples in near-real-time; you do not need to wait minutes for the algorithm to complete. This is particularly the case when a smaller preview area is selected.
As stated previously, please note however, that the 'PSF Resampling' feature is only carried out on any samples that exist in the preview area. As a result, when a 'PSF Resampling' mode is selected, previews may differ somewhat from the full image. To achieve a preview for an area when a 'PSF Resampling' mode is selected, try to include as many samples in the preview area as possible when defining the preview area's bounding box.
With the aforementioned caveat with regards to resampling in mind however, any samples that fall outside the preview are still used for construction of the local PSF models for pixels inside the preview. In other words, the results in the preview should be near-identical to deconvolution of the full image, unless a specific 'PSF Resampling' mode is used.
Noise and artifact propagation
While it is best to avoid overly aggressive settings that exacerbate noise grain (for example by specifying a too large number of iterations), a significant portion of such grain will be still be very effectively addressed during the final noise reduction stage; StarTools' Tracking engine will have pin-pointed the noise grain and its severity and should be able to significantly reduce its prevalence during final noise reduction (e.g. when switching Tracking off).
Ringing artifacts and/or singularity-related artifacts are harder to address and their development are best avoided in the first place by choosing appropriate settings. As a last resort, the 'Deringing Amount', 'Deringing Detect' and 'Deringing Fuzz' parameters can be used to help mitigate their prevalence.
You may also be interested in...
- L. B., United States (under Testimonials)
I'm relatively new to image processing and just wanted to say how straight forward and powerful StarTools is.
- Color retention (under Usage)
The two aspects - colour and luminance - of your image are neatly separated thanks to StarTools' signal evolution Tracking engine.
- Tracking (under Introduction)
Tracking how you process your data also allows the noise reduction routines in StarTools to achieve superior results.
- Stereo 3D: Plausible depth information synthesis for 3D-capable media and Virtual Reality (under Features & Documentation)
The Stereo 3D module can be used to synthesise depth information based on astronomical image feature characteristics.
- Standalone Virtual Reality experience (under Exporting 3D)
The 'WebVR' button in the module exports your image as a standalone HTML file.