- Usage
- Understanding AutoDev's behavior
Understanding AutoDev's behavior
In AutoDev, you are controlling an impartial and objective detail detector, rather than a subjective and hard to control (especially in the highlights) bezier/spline curve.
Having something impartial and objective taking care of your initial stretch is very valuable, as it allows you to much better set up a "neutral" image that you can build on with the other local detail-enhancing tools in your arsenal (e.g. Sharp, HDR, Contrast, Decon, etc.). For example, when using Autodev, it will quickly become clear that point lights and over-exposed highlights, such as the cores of bright stars, remain much more defined. The dreaded "star bloat" effect is much less pronounced or even entirely absent, depending on the dataset.
However, knowing how to effectively use Region of Interests ("RoI") is crucial to making the most of AutoDev. Particularly if the object of interest is not image-filling, a Region of Interest will often be necessary. Fortunately the fundamental workings of the RoI are easy to understand.
Detail inside the RoI
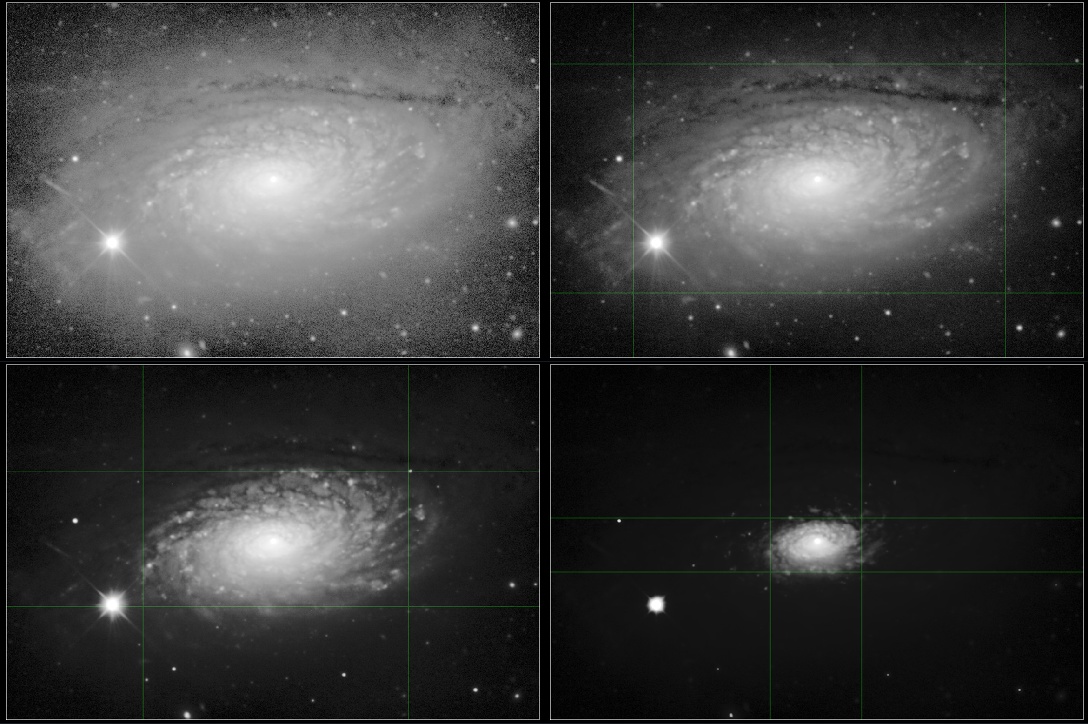
Let's say our image is of galaxy, neatly situated in the center. Then confining the RoI progressively to the core of the galaxy, the stretch becomes more and more optimised for the core and less and less for the outer rim. Conversely, if we want to show more of the outer regions as well, we would include those regions in the RoI.
Detail outside the RoI
Shrinking or enlarging the RoI, you will notice how the stretch is optimised specifically to show as much as possible of the image inside of the RoI. That is not to say any detail outisde the RoI shall be invisible. It just means that any detail there will not (or much less) have a say in how the stretch is made. For example, if we would have an image of a galaxy, cloned it, put the two image side by side to create a new image, and then specified the RoI perfectly over just one of the cloned galaxies, the other one, outside the RoI would be stretched precisely the same way (as it happens to have exactly the same detail). Whatever detail lies outside the RoI, is simply forced to conform to the stretch that was designed for the RoI.
It is important to note that AutoDev will never clip your blackpoints outside the RoI, unless the 'Outside RoI Influence' parameter is explicitly set to 0% (though it is still not guaranteed to clip even at that setting). Detail outside the RoI may appear very dark (and approach 0/black), but will never be clipped.
Bringing up the 'Outside RoI Influence' parameter will let AutoDev allocate the specified amount of dynamic range to the area outside the RoI as well, at the expens of some dynamic range inside the RoI. If 'Outside RoI Influence' set 100%, then precisely 50% of the dynamic range will be used to show detail inside the RoI and 50% of the dynamic range will be used to show detail outside the RoI. Note that, visually, this behavior is area-size dependent; if the RoI is only a tiny area, the area outside the RoI will have to make do with just 50% of the dynamic range to describe detail for a much larger area (e.g. it has to divide the dynamic range over many more pixels), while the smaller RoI area has much fewer pixels and can therefore allocate each pixel more dynamic range if needed, in turn showing much more detail.

Choosing the RoI in case of multiple objects of interest
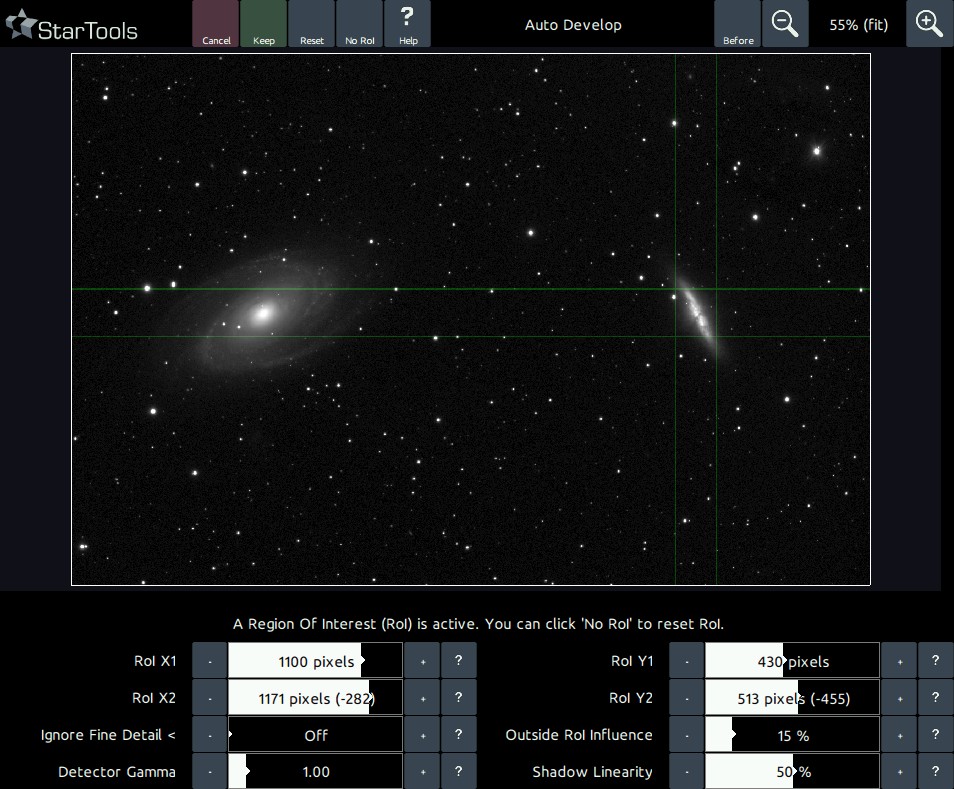
All the RoI needs, is the best possible example of the dynamic range problem it should be solving for. Therefore, you should always give an example that has the widest dynamic range (e.g. has features that run from most dark to most bright). For example, when using AutoDev for the M81 / M82 galaxy pair, it is recommended you choose M81 (a brighter magnitude 6.9) as your RoI and not M82 (with a dimmer magnitude of 8.4).
In the above example, should you use M82 rather than M81 as a reference for the RoI, then you will notice M81's core brightening a lot and any detail contained therein being much harder to see. Of course, under no circumstances will the M81 core over-expose completely; a minute amount of dynamic range will always be allocated to it thanks to the 'Outside RoI' Influence parameter (possibly unless set to 0).
Keeping in mind AutoDev's purpose
The purpose of AutoDev is to give you the most optimal global starting point, ready for enhancement and refinement with modules on a more local level. Always keep in the back of your mind that you can use local detail restoration modules such as the Contrast, HDR and Sharp modules to locally bring out detail. Astrophotography deals with enormous differences in brightness; many objects are their own light source and can range from incredibly bright to incredibly dim. Most astrophotographers strive to show as many interesting astronomical details as possible. StarTools offers you various tools that put you in absolute, objective control over managing these enormous differences in brightness, to the benefit of your viewers.
You may also be interested in...
- Presets (under Interface)
Most modules come with presets that quickly dial in useful parameter settings.
- Usage (under Color)
Any decisions you make affecting your detail does not affect the colouring of said detail, and vice-versa.
- Stereo 3D: Plausible depth information synthesis for 3D-capable media and Virtual Reality (under Features & Documentation)
The Stereo 3D module can be used to synthesise depth information based on astronomical image feature characteristics.
- Standalone Virtual Reality experience (under Exporting 3D)
The 'WebVR' button in the module exports your image as a standalone HTML file.
- Step 2: Inspect your dataset (under Quick Start)
In the presence of problems, AutoDev will show them until they are dealt with.