Masks
The Mask feature is an integral part of StarTools. Many modules use a mask to operate on specific pixels and parts of the image, leaving other parts intact.
Importantly, besides operating only on certain parts of the image, it allows the many modules in StarTools to perform much more sophisticated operations.
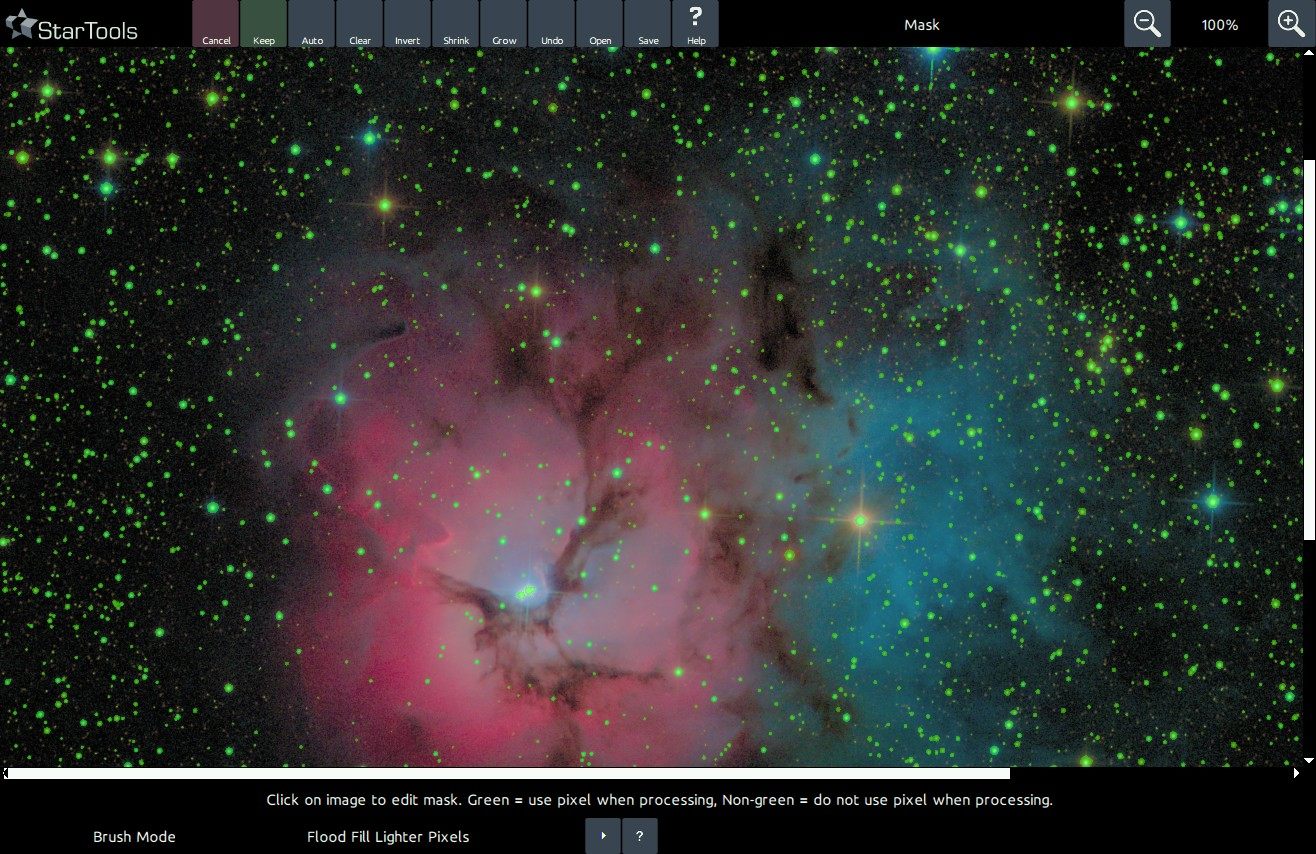
You may have noticed that when you launch a module that is able to apply a mask, the pixels that are set in the mask will flash three times in green. This is to remind you which parts of the image will be affected by the module and which are not. If you just loaded an image, all pixels in the whole image will be set in the mask, so every pixel will be processed by default. In this case, when you launch a module that is able to apply a mask, the whole image will flash in green three times.
You may have noticed that when you launch a module that is able to apply a mask, the pixels that are set in the mask will flash three times in green.
Green coloured pixels in the mask are considered 'on'. That is to say, they will be altered/used by whatever processing is carried out by the module you chose. 'Off' pixels (shown in their original colour) will not be altered or used by the active module. Again, please note that, by default all pixels in the whole image are marked 'on' (they will all appear green).
For example, an 'on' pixel (green coloured) in the Sharp module will be sharpened, in the Wipe module it will be sampled for gradient modelling, in Synth it will be scanned for being part of a star, in Heal in will be removed and healed, in Layer it will be layered on top of the background image, etc.
To recap;
- If a pixel in mask is 'on' (coloured green), then this pixel is fed to the module for processing.
- If a pixel in mask is 'off' (shown in original colour), then tell the module to 'keep the pixel as-is, hands off, do not touch or consider'.
Usage
The Mask Editor is accessible from the main screen, as well as from the different modules that are able to apply a mask. The button to launch the Mask Editor is labelled 'Mask'. When launching the Mask Editor from a module, pressing the 'Keep' or 'Cancel' buttons will return StarTools to the module you pressed the 'Mask' button in.
As with the different modules in StarTools, the 'Keep' and 'Cancel' buttons work as expected; 'Keep' will keep the edited Mask and return, while 'Cancel' will revert to the Mask as it was before it was edited and return.
As indicated by the 'Click on the image to edit mask' message below the image, clicking on the image will allow you create or modify a Mask. What actually happens when you click the image, depends on the selected 'Brush mode'. While some of the 'Brush modes' seem complex in their workings, they are quite intuitive to use.
Apart from different brush modes to set/unset pixels in the mask, various other functions exist to make editing and creating a Mask even easier;
- The 'Save' button allows you to save the current mask to a standard TIFF file that shows 'on' pixels in pure white and 'off' pixels in pure black.
- The 'Open' button allows you to import a Mask that was previously saved by using the 'Save' button. Note that the image that is being opened to become the new Mask, needs to have the same dimensions as the image the Mask is intended for. Loading an image that has values between black and white will designate any shades of gray closest to white as 'on', and any shades of gray closest to black as 'off'.
- The 'Auto' button is a very powerful feature that allows you to automatically isolate features.
- The 'Clear' button turns off all green pixels (i.e. it deselects all pixels in the image).
- The 'Invert' button turns on all pixels that are off, and turns off all pixels that were on.
- The 'Shrink' button turns off all the green pixels that have a non-green neighbour, effectively 'shrinking' any selected regions.
- The 'Grow' button turns on any non-green pixel that has a green neighbour, effectively 'growing' any selected regions.
- The 'Undo' button allows you to undo the last operation that was performed.
NOTE: To quickly turn on all pixels, click the 'clear' button, then the 'invert' button.
Brush modes
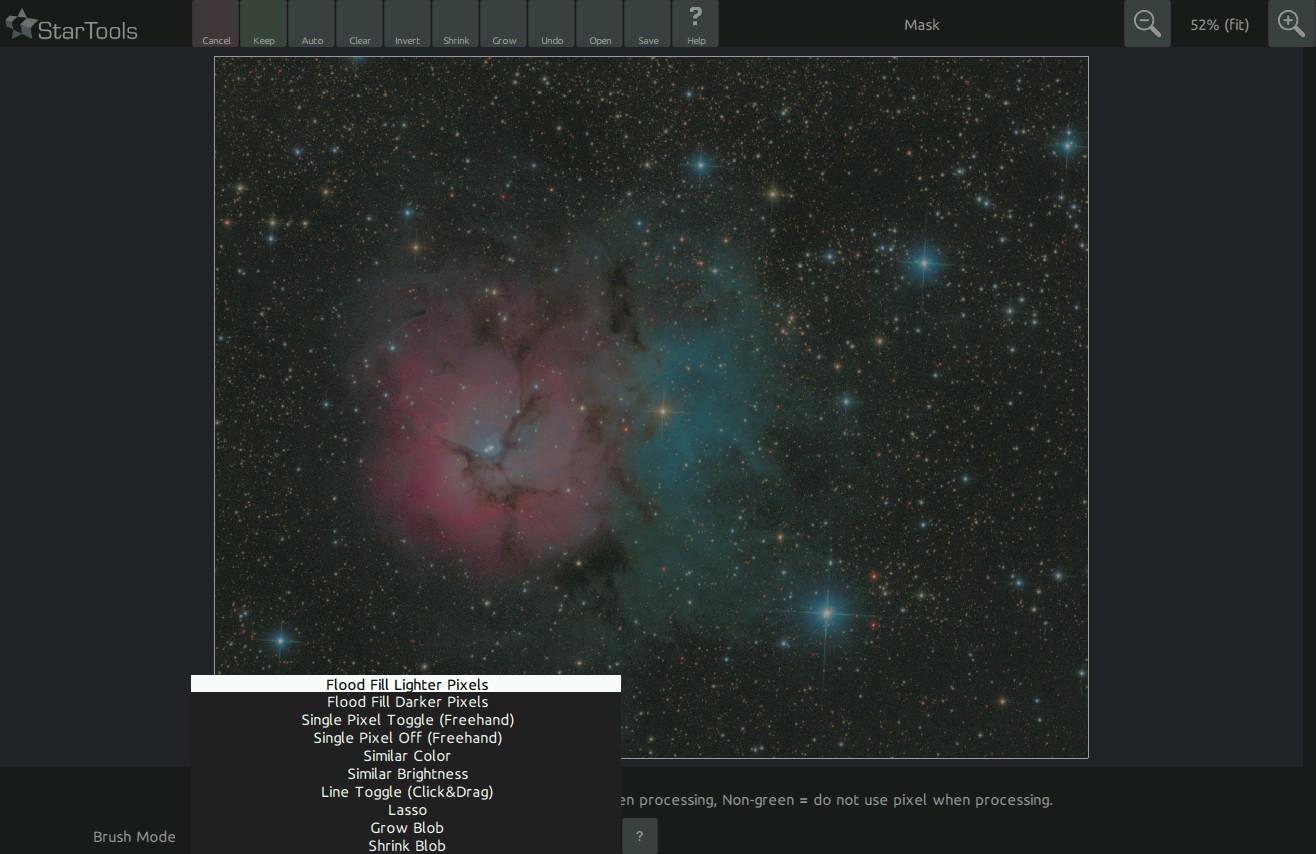
Different 'Brush modes' help in quickly selecting (and de-selecting) features in the image.
For example, while in 'Flood fill lighter pixels' mode, try clicking next to a bright star or feature to select it. Click anywhere on a clump of 'on' (green) pixels, to toggle the whole clump off again.
The mask editor has 10 'Brush modes';
- Flood fill lighter pixels; use it to quickly select an adjacent area that is lighter than the clicked pixel (for example a star or a galaxy). Specifically, Clicking a non-green pixel will, starting from the clicked pixel, recursively fill the image with green pixels until it finds that; either all neighbouring pixels of a particular pixel are already filled (on/green), or the pixel under evaluation is darker than the original pixel clicked. Clicking on a green pixel will, starting from the clicked pixel, recursively turn off any green pixels until it can no longer find any green neighbouring pixels.
- Flood fill darker pixels; use it to quickly select an adjacent area that is darker than the clicked pixel (for example a dust lane). Specifically, clicking a non-green pixel will, starting from the clicked pixel, recursively fill the image with green pixels until it finds that; either all neighbouring pixels of a particular pixel are already filled (on/green), or the pixel under evaluation is lighter than the original pixel clicked. Clicking on a green pixel will, starting from the clicked pixel, recursively turn off any green pixels until it can no longer find any on/green neighbouring pixels.
- Single pixel toggle; clicking a non-green pixel will make a non-green pixel turn green. Clicking a green pixel will make green pixel turn non-green. It is a simple toggle operation for single pixels.
- Single pixel off (freehand); clicking or dragging while holding the mouse button down will turn off pixels. This mode acts like a single pixel "eraser".
- Similar color; use it to quickly select an adjacent area that is similar in color.
- Similar brightness; use it to quickly select an adjacent area that is similar in brightness.
- Line toggle (click & drag); use it to draw a line from the start point (when the mouse button was first pressed) to the end point (when the mouse button was released). This mode is particularly useful to trace and select satellite trails, for example for healing out using the Heal module.
- Lasso; toggles all the pixels confined by a convex shape that you can draw in this mode (click and drag). Use it to quickly select or deselect circular areas by drawing their outline.
- Grow blob; grows any contiguous area of adjacent pixels by expanding their borders into the nearest neighbouring pixel. Use it to quickly grow an area (for example a star core) without disturbing the rest of the mask.
- Shrink blob; shrinks any contiguous area of adjacent pixels by withdrawing their borders into the nearest neighbouring pixel that is not part of a border. Use it to quickly shrink an area without disturbing the rest of the mask.
The Auto Feature
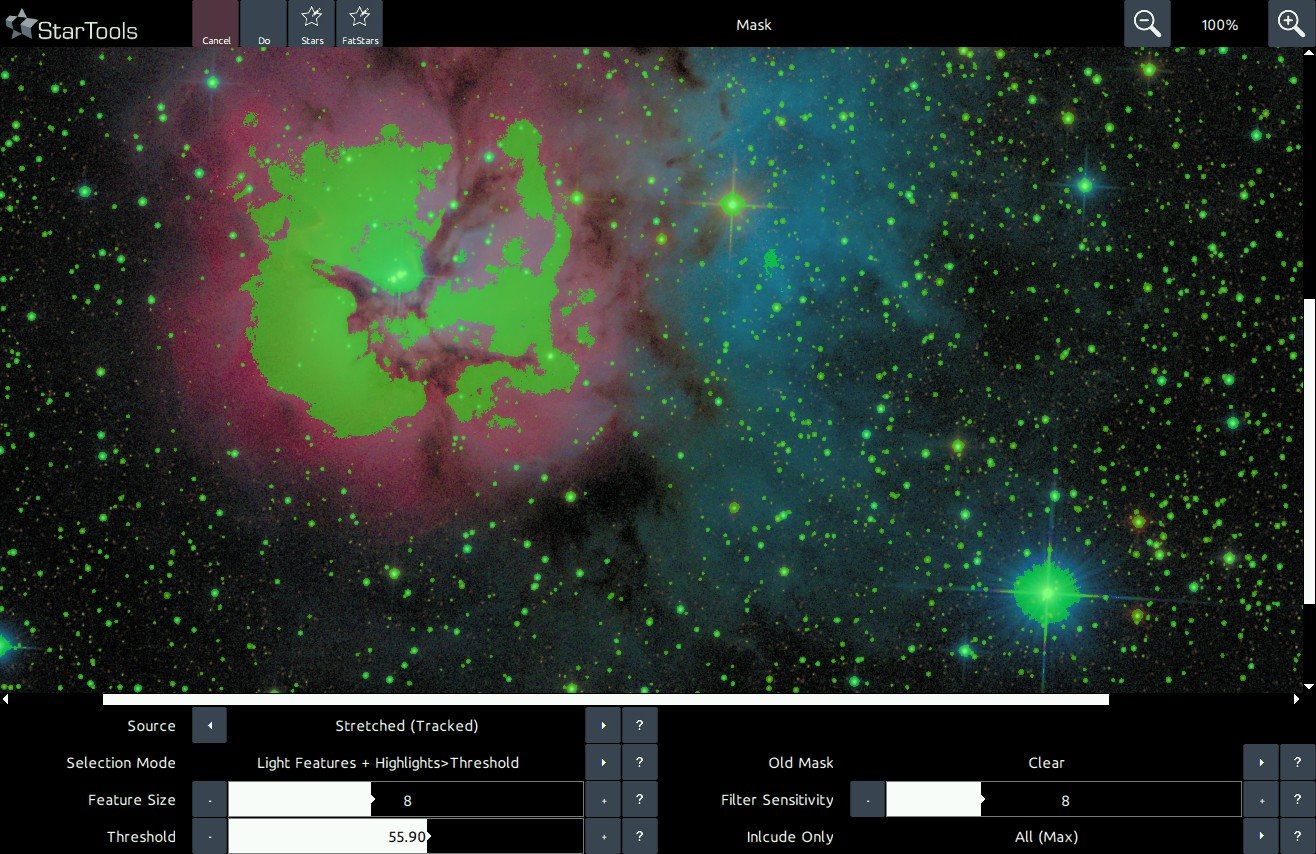
The powerful 'Auto' function quickly and autonomously isolates features of interest such as stars, noise, hot or dead pixels, etc.
For example, isolating just the stars in an image is a necessity for obtaining any useful results from the 'Decon' and 'Magic' module.
The type of features to be isolated are controlled by the 'Selection Mode' parameter
- Light features + highlight > threshold; a combination of two selection algorithms. One is the simpler 'Highlight > threshold' mode, which selects any pixel whose brightness is brighter than a certain percentage of the maximum value (see the 'Threshold' parameter below). The other selection algorithm is 'Light features' which selects high frequency components in an image (such as stars, gas knots and nebula edges), up to a certain size (see 'Max. feature size' below) and depending on a certain sensitivity (see 'Filter sensitivity' below'). This mode is particularly effective for selecting stars. Note that if the 'Threshold' parameter is kept at 100%, this mode produces results that are identical to the 'Light features' mode.
- Light features; selects high frequency components in an image (such as stars, gas knots and nebula edges), up to a certain size (see 'Max feature size') and depending on a certain sensitivity (see 'Filter sensitivity').
- Highlight > threshold; selects any pixel whose brightness is brighter than a certain percentage of the maximum (e.g. pure white) value. . If you find this mode does not select bright stars with white cores that well, open the 'Levels' module and set the 'Normalization' a few pixels higher. This should make light features marginally brighter and dark features marginally darker.
- Dead pixels color/mono < threshold; selects dark high frequency components in an image (such star edges, halos introduced by over sharpening, nebula edges and dead pixels), up to a certain size (see 'Max feature size' below) and depending on a certain sensitivity (see 'Filter sensitivity' below') and whose brightness is darker than a certain percentage of the maximum value (see the Threshold parameter below). It then further narrows down the selection by looking at which pixels are likely the result of CCD defects (dead pixels). Two versions are available, one for color images, the other for mono images.
- Hot pixels color/mono > threshold; selects high frequency components in an image up to a certain size (see 'Max feature size' below) and depending on a certain sensitivity (see 'Filter sensitivity' below). It then further narrows down the selection by looking at which pixels are likely the result of CCD defects or cosmic rays (also known as 'hot' pixels). The 'Threshold' parameter controls how bright hot pixels need to be before they are potentially tagged as 'hot'. Note that a 'Threshold' of less than 100% needs to be specified for this mode to have any effect. Noise Fine - selects all pixels that are likely affected by significant amounts of noise. Please note that other parameters such as the 'Threshold', 'Max feature size', 'Filter sensitivity' and 'Exclude color' have no effect in this mode. Two versions are available, one for color images, the other for mono images.
- Noise; selects all pixels that are likely affected by significant amounts of noise. This algorithm is more aggressive in its noise detection and tagging than 'Noise Fine'. Please note that other parameters such as the 'Threshold', 'Max feature size', 'Filter sensitivity' and 'Exclude color' have no effect in this mode.
- Dust & scratches; selects small specks of dusts and scratches as found on old photographs. Only the 'Threshold' parameter is used, and a very low value for the 'Threshold' parameter is needed.
- Edges > Threshold; selects all pixels that are likely to belong to the edge of a feature. Use the 'Threshold' parameter to set sensitivity where lower values make the edge detector more sensitive.
- Horizontal artifacts; selects horizontal anomalies in the image. Use the 'Max feature size' and 'Filter sensitivity' to throttle the aggressiveness with which the detector detects the anomalies.
- Vertical artifacts; selects vertical anomalies in the image. Use the 'Max feature size' and 'Filter sensitivity' to throttle the aggressiveness with which the detector detects the anomalies.
- Radius; selects a circle, starting from the centre of the image going outwards. The 'Threshold' parameter defines the radius of the circle, where 100.00 covers the whole image.
Some of the selection algorithms are controlled by additional parameters;
- Include only; tells the selection algorithms evaluate specific colour channels only when looking for features. This is particularly useful if you have a predominantly red, purple and blue nebula with white stars in the foreground and, say, you'd want to select only the stars. By setting 'Include only' to 'Green', you are able to tell the selection algorithms to leave red and blue features in the nebula alone (since these features are most prominent in the red and blue channels). This greatly reduces the amount of false positives.
- Max feature size; specifies the largest size of any feature the algorithm should expect. If you find that stars are not correctly detected and only their outlines show up, you may want to increase this value. Conversely, if you find that large features are being inappropriately tagged and your stars are small (for example in wide field images), you may reduce this value to reduce false positives.
- Filter sensitivity; specifies how sensitive the selection algorithms should be to local brightness variations. A lower value signifies a more aggressive setting, leading to more features and pixels being tagged.
- Threshold; specifies a percentage of full brightness (i.e. pure white) below, or above which a selection algorithm should detect features.
Finally, the 'Source' parameter selects the source data the Auto mask generator should use. Thanks to StarTools' Tracking functionality which gives every module the capability to go "back in time", the Auto mask generator can use either the original 'Linear' data (perfect for getting at the brightest star cores), the data as you see it right now ('Stretched'), or the data as you see now but taking into account noise propagation ('Stretched (Tracked)'). The latter greatly helps reduce false positives caused by noise.
Using masks from startools.log
StarTools stores the masks you used in your workflow in the StarTools.log file itself. This StarTools.log file is located in the same folder as the executables. The masks are encoded as BASE64 PNG images. To convert the BASE64 text into loadable PNG images, you can use any online (or offline) BASE64 converter tool.
The part to copy and paste, typically starts with;
iVBOR.....
Online BASE64 converter by Motobit
One online tool for BASE64 is Motobit Software's BASE64 encoder/decoder.
To use it to convert StarTools masks back into importable PNG files;
- Paste the BASE64 code into the text box
- Select the 'decode the data from a Base64 string (base64 decoding)' radio button
- Select the 'export to a binary file, filename:' radio button.
- Name the file for example "mask.png"
- Click the convert the source data button.
This should result in a download of the mask as a PNG file which can be imported into the StarTools mask editor, as welll as other applications.
Advanced techniques
The mask editor and its auto-mask generator are very flexible tools. These more advanced techniques will allow you to create specialised masks for specific situations and purposes.
Object protection
Sometimes, it is desirable to keep an object or area from being included in an auto-generated mask. It is possible to have the auto-mask generator operate only on designated areas;
- Clear the mask, and select the part of the image you wish to protect with the Flood Fill Lighter or Lasso tool, then click Invert.
- In the Auto mask generator, set the parameters you need to generate your mask. Be sure to set 'Old Mask' to 'Add New Where Old Is Set'.
- After clicking 'Do'. The auto-generator will generate the desired mask, however excluding the area we specified earlier.
The ethics of using masks and selective processing
Where documentary photography is concerned, selective manipulation by hand is typically frowned upon, unless the practice of it is clearly stated when the final result is presented.
However, in cases where a mask is algorithmically derived, purely from the dataset itself, without adding any outside extra information, masking is common practice even in the realm of documentary photography. Examples of such use cases are range masks (for example, selecting highlights only based on brightness), star mask (selecting stars only based on stellar profile), colour masks (selecting features based on colour), etc.
In some modules in StarTools specifically, masks are used for the purpose of selective sampling to create internal parameters for an operation that is applied globally to all pixels. This too is common practice in the realm of documentary photography. Examples of such use cases are gradient modelling (selecting samples to model a global gradient on) and color balancing (selecting samples to base an global white balance on).
Finally, it is also generally permitted to mask out singularities (pixels with a value that is unknown) by hand, in order to exclude this from some operations that may otherwise generate artefacts in response to encountering these. Examples may be over-exposing star cores, dead or hot pixels, stacking artefacts, or other data defects.
As a courtesy, when in doubt, it is always good to let you viewers know how you processed an image, in order to avoid confusion.
You may also be interested in...
- Mouse controls (under Interface)
As of 1.7, enhanced mouse controls are implemented; Zoom in.
- Preparing data for the Wipe module (under Usage)
The reason Wipe backs off is that Wipe (as is the case with most modules in StarTools) refuses to clip your data.
- Usage (under Wipe)
Signal bias is a fixed background levels which, contrary to a gradient, affects the whole image evenly.
- Parameters (under Usage)
The 'Halo Extend' parameter effectively grows the given mask temporarily, thereby including more of each star's surroundings.